Multiclass semantic segmentation with LinkNet34
June 05, 2018
6 mins read
Software and Hardware
The model used in the submission as well as previous experiments were prepared with use of different machines and GPUs depends on their availability and spare time. The variety of video cards includes Nvidia GTX 1070, 1080 Ti, Tesla V100 (as a p3.2xlarge AWS instance).
The deep neural network was implemented with PyTorch 0.4 framework. The framework was chosen for its flexibility, which is comparable to TensorFlow, and simplicity of prototyping on a par with Keras. The great fast and easy to use dataloader is also a huge advantage of the deep learning framework.
NumPy and OpenCV libraries were involved in data preparation and postprocessing. However, PyTorch itself played a crucial rule in predictions postprocessing as it can be used for some computer vision image processing (such as morphological dilation and erosion operations) right on GPU. This helped a lot in the pipeline speeding up.
Data and preprocessing
Samples from the official train dataset, as well as provided by the community datasets and manually generated ones were utilized for training and validation. Totally, there were 15601 images in train subset and 1500 in the validation one.
The generated images were manually filtered in order to exclude a long series of frames without of any movements. Such may occur when the car is stopped at a red traffic light, and not a lot of moving other cars are visible. Such series of same images may lead to overfitting to them, that is why such cases were removed from the training and validation datasets.
Binary labeled images for vehicles and binary labeled images for the drivable surface of the road were generated out of the provided label images with help of NumPy and openCV. The camera-carrier vehicle hood was excluded from labeling as it is required by the challenge rules. An additional background class was defined as “everything except the road and vehicles”. So, the target was organized as a three channel binary image.
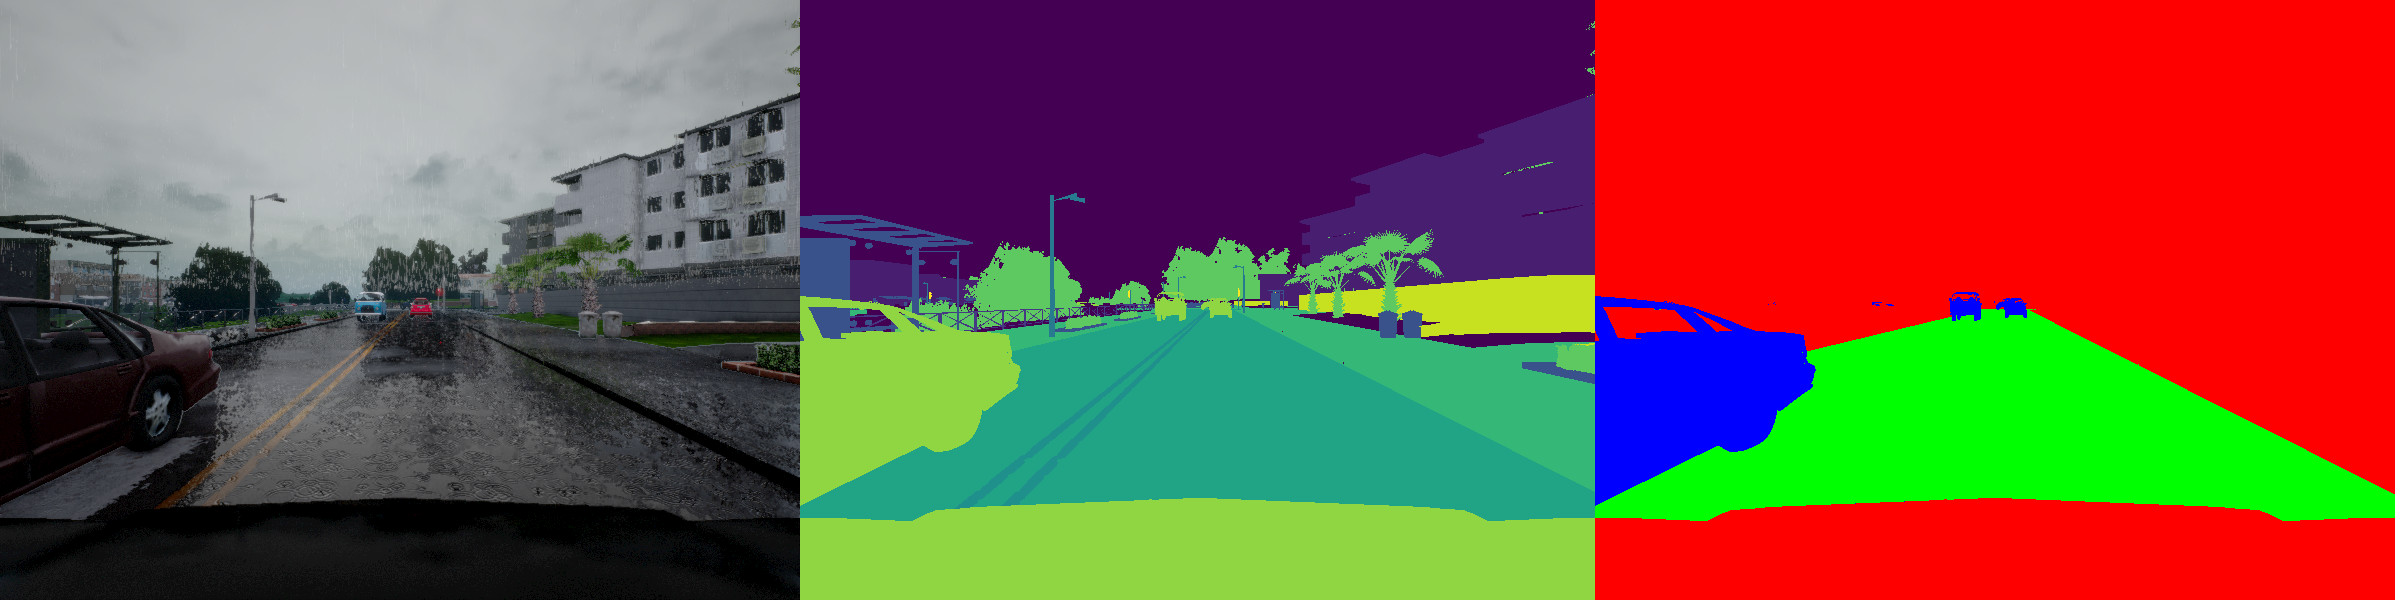
Left to right: original image; raw masks; preprocessed target masks.
Images were augmented online during training by random gamma, color, and brightness adjustment. The augmentation was done right on a GPU for training time reduction.

Example of a train image augmentation.
Model
U-Net like encoder-decoder architectures of fully convolutional neural networks with skip-connections (for spatial information lost prevention) are proved to be great in semantic segmentation tasks. For the competition, a LinkNet34 architecture was chosen because it is quite fast and accurate and it was successfully used by many teams in other semantic segmentation competitions on Kaggle or other platforms.
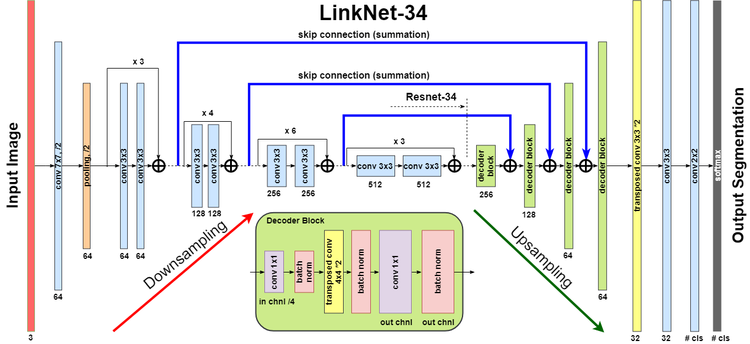 The LinkNet34 architecture with ResNet34 encoder. Picture from a MICCAI 2017 Endoscopic Vision SubChallenge: Robotic Instrument Segmentation report by Alexey Shvets, Alexander Rakhlin, Alexandr Kalinin and Vladimir Iglovikov.
The architecture uses ResNet34 as an encoder and correspondent decoder blocks based on transposed convolutions with the same number of filters as encoders blocks on the same scale. The model code is organized so it is very simple to change the encoder architecture (select encoder from a list of available ResNets implemented in the PyTorch model zoo) or change the output layer. In the case, softmax layer was used for output as classes are expected to be not overlayed. However, some experiments with sigmoid were also carried out.
Training
For loss (1 - target metric of average F0.5(road) and F2(car)) was applied. It is quite similar to standard Dice index loss but introduces desired ratio of precision/recall. Such loss produced better results as compared to BCELoss during experiments. Different weights were tested. It was found out, that in this particular challenge, use of BCE loss component does not improve results. Finally, balanced weights were chosen. So, the loss looks like this:
Loss = (1 - F2(car)) + (1 - F0.5(road)) + (1 - F1(background))
The code is organized in such way that makes it simple to experiment with different weights of different classes as well as change beta in F-beta scores.
1
2
3
4
5
6
7
8
9
10
11
12
13
14
15
16
17
import torch

smooth = 1e-4
def fb_loss(preds, trues, beta):
    beta2 = beta*beta
    batch = preds.size(0)
    classes = preds.size(1)
    preds = preds.view(batch, classes, -1)
    trues = trues.view(batch, classes, -1)
    weights = torch.clamp(trues.sum(-1), 0., 1.)
    TP = (preds * trues).sum(2)
    FP = (preds * (1-trues)).sum(2)
    FN = ((1-preds) * trues).sum(2)
    Fb = ((1+beta2) * TP + smooth)/((1+beta2) * TP + beta2 * FN + FP + smooth)
    Fb = Fb * weights
    score = Fb.sum() / (weights.sum() + smooth)
    return torch.clamp(score, 0., 1.)
F-beta score calculation for a batch of images with PyTorch
The best checkpoint for the submit was chosen by max score metric, which is the same as the evaluation function used on the leaderboard:
Score = (F0.5(road) + F2(car))/2
The model was trained with Adam optimizer. Learning rate was manually decreased several times during training. The final learning rates was: 75 epochs with lr=1e-4; 20 epochs with lr=1e-5 and finally 10 epochs with lr=1e-6.
Results postprocessing
The model output is a matrix with elements in the range [0..1] (softmax layer output), so, it should be binarized. A simple thresholding was applied. As recall is more important than precision for the ‘car’ class, so its threshold is quite low. Contrary, the road threshold is high enough.
After binarization of the output, a simple classical computer vision can be applied for the final score improvement. Morphology erosion and dilation operations, which can be performed on the GPU are included in the prediction script. It was observed, that a slight dilation increase the F-score on the ‘car’ class, so it is applied in the final version of the script.
As the car hood is a constant part of a camera image, its pixels were deliberately excluded from predictions. The hood mask was saved from a training image and it was noticed that such simple postprocessing could add a bit to the final score as it removes some wrongly included road pixels on the hood edge. As the process is done on the GPU, the FPS is not significantly reduced by the step.
The project code is available on Github.